หลังทำ Remote Access: Expose Services with Cloudflare Tunnel (1/3) แล้ว ผมอยาก SSH เข้า Linux server ที่บ้านจาก Laptop โดยไม่ต้องเปิด port 22 ออกอินเทอร์เน็ต — ใช้ tunnel เดิมที่มีอยู่แล้ว เพิ่ม ingress สำหรับ SSH ตั้ง ProxyCommand ฝั่ง client และยืนยันตัวตนด้วย SSH public key ตามปกติ
แพลตฟอร์ม: Linux server ที่บ้าน (มี
sshd) และ client ที่ติดตั้งcloudflaredได้ (Linux, macOS, Windows) — คำสั่ง SSH อ้างอิง OpenSSH
Client กับ Server คืออะไร?
ในบทความนี้แบ่งเครื่องเป็น 2 ฝั่ง:
- Client — Laptop ที่คุณนั่งใช้งาน รัน
sshและcloudflared(ผ่านProxyCommand) ถือ private key - Server — Linux server ที่บ้าน รัน
cloudflared(tunnel) และsshdเก็บ public key ในauthorized_keys
flowchart LR
    subgraph client ["Client — Laptop"]
        direction TB
        C_ssh["ssh + ~/.ssh/config"]
        C_cfd["cloudflared ProxyCommand"]
        C_key["private key"]
        C_ssh --> C_cfd
        C_ssh --> C_key
    end

    CF["Cloudflare Edge"]

    subgraph server ["Server — Linux server ที่บ้าน"]
        direction TB
        S_cfg["config.yml ingress"]
        S_cfd["cloudflared tunnel"]
        S_sshd["sshd :22"]
        S_auth["authorized_keys"]
        S_cfg --> S_cfd --> S_sshd --> S_auth
    end

    client -->|"SSH ผ่าน tunnel"| CF
    CF --> server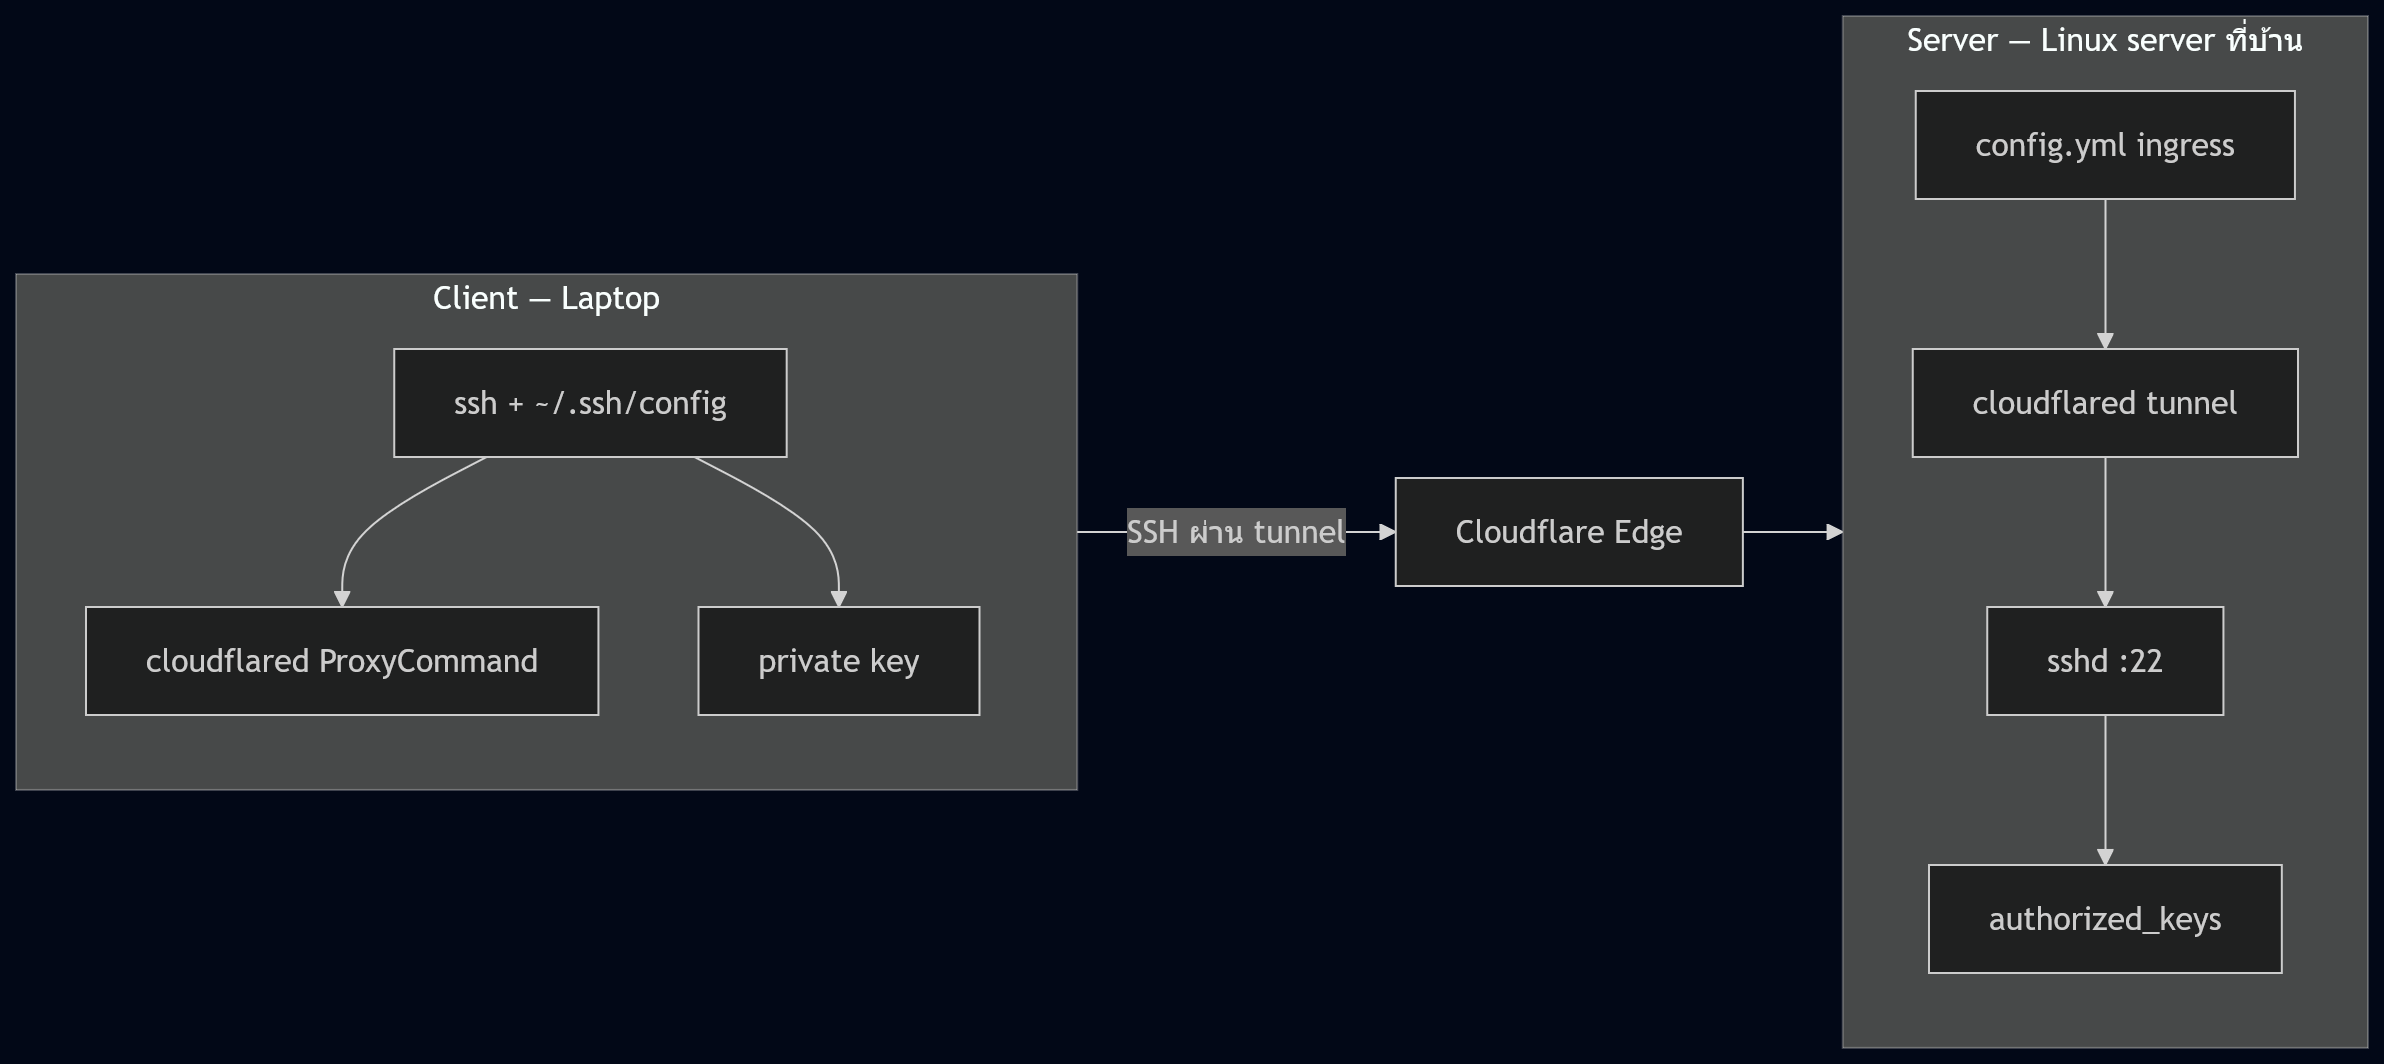
ทำไม SSH ผ่าน Tunnel?
วิธีเดิมเปิด port 22 ที่ Router ให้โลกภายนอกยิงเข้ามาได้ — ถ้า ISP ใช้ CG-NAT ยังทำไม่ได้อีกด้วย (อธิบายใน Remote Access: Expose Services with Cloudflare Tunnel (1/3))
SSH ผ่าน Cloudflare Tunnel ใช้หลักเดียวกับ expose เว็บ:
- Linux server ไม่รับ connection จากอินเทอร์เน็ตตรง ๆ —
cloudflaredเปิด tunnel ออกไปหา Cloudflare - คุณ SSH จาก Laptop → traffic วิ่งผ่าน Cloudflare Edge → tunnel →
sshdบนlocalhost:22 - ไม่ต้อง port forward port 22 — ชั้นยืนยันตัวตนอยู่ที่
sshd(public key) ไม่ใช่เปิด port สาธารณะ
sequenceDiagram
    actor User as User (Laptop)
    participant CFD as cloudflared (client)
    participant CF as Cloudflare Edge
    participant Tunnel as cloudflared (home server)
    participant SSHD as sshd localhost:22

    User->>CFD: ssh [email protected]
    CFD->>CF: Open tunnel session via ProxyCommand
    CF->>Tunnel: Route to ssh hostname
    Tunnel->>SSHD: Forward to localhost:22
    SSHD-->>User: SSH session (public key auth)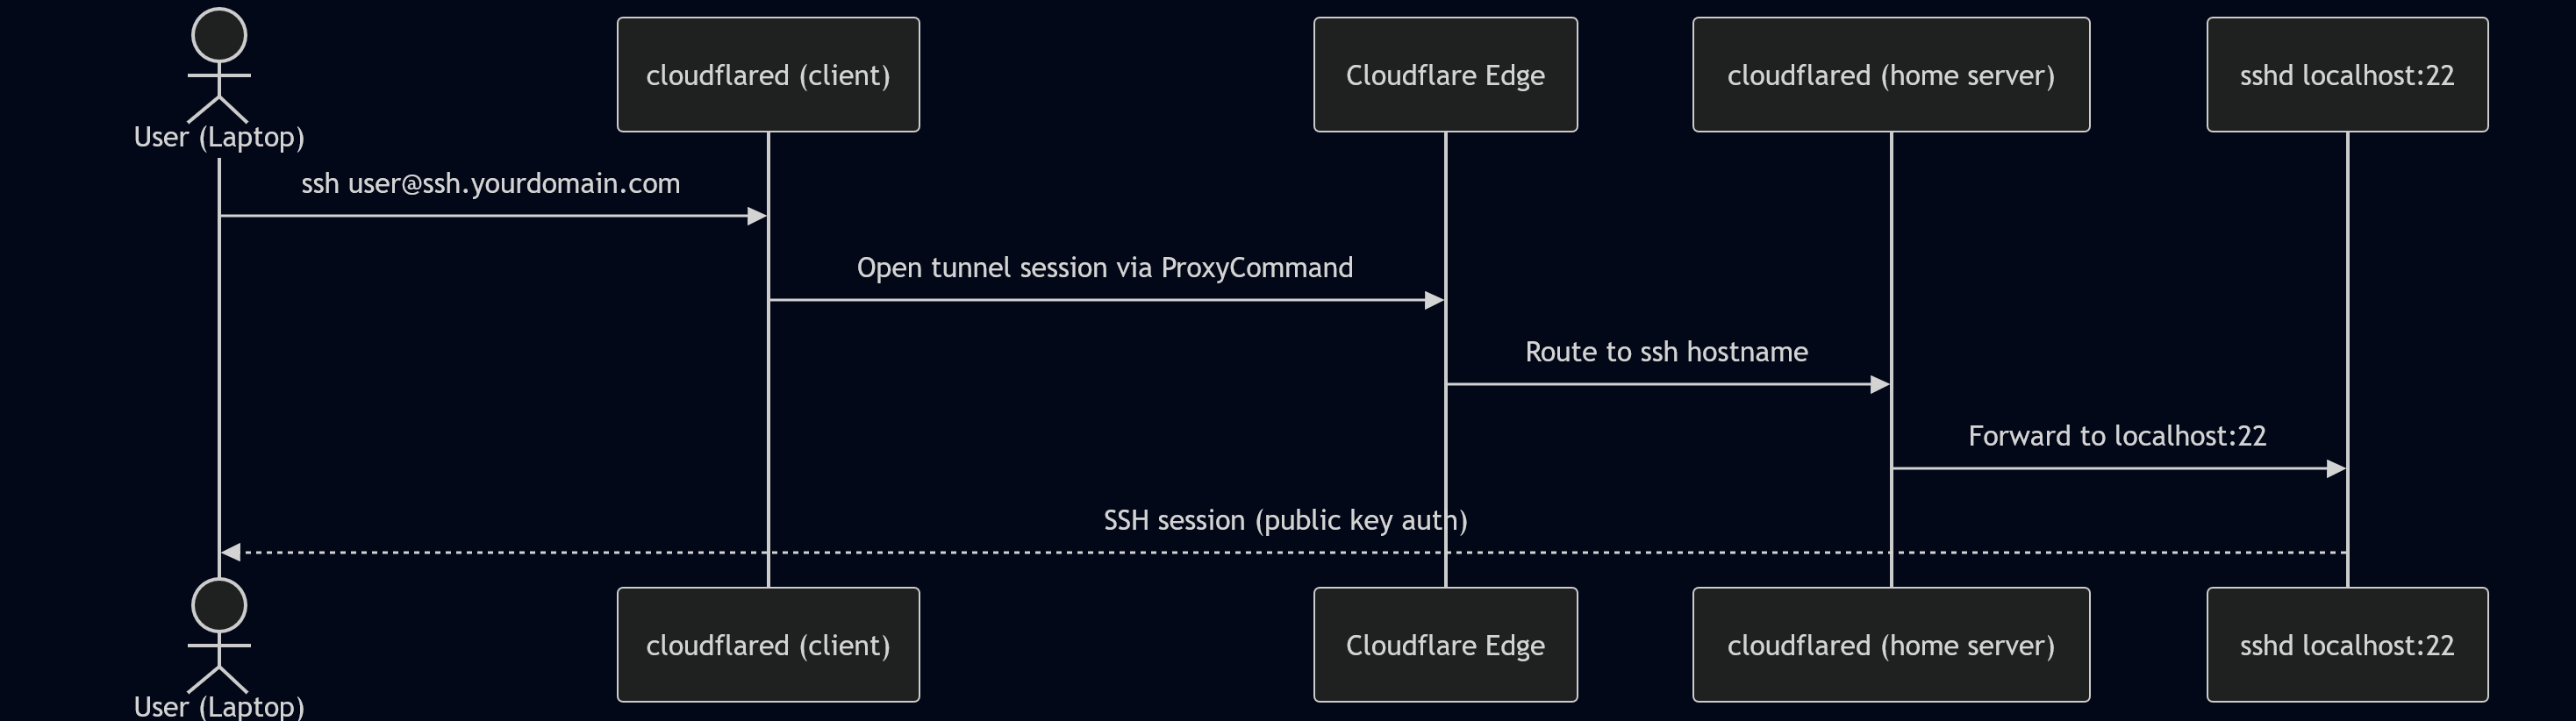
Prerequisites
ก่อนเริ่มต้องมี:
- ทำตาม Remote Access: Expose Services with Cloudflare Tunnel (1/3) จน tunnel ใช้งานได้ — มี
~/.cloudflared/config.yml, credentials file และรู้ tunnel name (เช่นmy-home-server) - Cloudflare account (ฟรี)
- Domain ที่ใช้ Cloudflare เป็น nameserver — ใช้ named tunnel เพื่อตั้ง hostname แบบ
ssh.yourdomain.com(quick tunnel ใช้ SSH แบบนี้ไม่ได้) - Linux server ที่บ้าน — guide นี้ใช้ Ubuntu/Debian (ทดสอบบน Ubuntu 24.04)
cloudflaredติดตั้งและรันบน Linux server — tunnel ยัง active อยู่- Linux server ต่อ Cloudflare ที่ outbound port 7844 ได้ (TCP/UDP) — ถ้าอยู่หลัง firewall เข้ม ตรวจก่อน (connectivity pre-checks)
sshdรันอยู่บน Linux server และฟัง port 22 (ค่าเริ่มต้นบน Ubuntu/Debian)- OpenSSH client บนเครื่องที่จะ SSH จาก (macOS/Linux มีมาให้, Windows 10+ มี
sshใน PowerShell) cloudflaredติดตั้งบนเครื่อง client (Laptop) — วิธีติดตั้งดู cloudflared releases หรือ Homebrew ตาม post 10
ตั้ง SSH public key
บทความนี้ใช้ public key authentication — Laptop ถือ private key (~/.ssh/id_ed25519) Linux server เก็บ public key ที่ตรงกันใน ~/.ssh/authorized_keys เมื่อ SSH เข้ามา sshd ตรวจ key แทนรหัสผ่าน
สร้าง key บน client (Laptop)
ถ้ายังไม่มี key ให้สร้างบนเครื่องที่จะ SSH จาก:
ssh-keygen -t ed25519 -C "[email protected]"กด Enter รับ path เริ่มต้น (~/.ssh/id_ed25519) — ตั้ง passphrase หรือไม่ใส่ก็ได้
ตรวจว่ามีไฟล์คู่กัน:
ls -la ~/.ssh/id_ed25519 ~/.ssh/id_ed25519.pubid_ed25519— private key ห้ามแชร์หรือ copy ไปเครื่องอื่นid_ed25519.pub— public key เอาไปใส่บน Linux server
ลงทะเบียน public key บน Linux server
แนะนำให้ วาง public key เอง บน Linux server คือ login ที่ console (หรือ session ที่เปิดอยู่แล้ว) แล้ว copy เนื้อหาไฟล์ .pub ไปต่อท้าย ~/.ssh/authorized_keys
อีกวิธีคือใช้ ssh-copy-id ตอนที่ยังเปิด password auth อยู่ก่อน แล้วค่อยปิด password authentication บน sshd (PasswordAuthentication no) ทีหลังก็ได้ — แต่ถ้าปิดไปแล้ว ssh-copy-id จะใช้ไม่ได้ เพราะคำสั่งนั้นต้อง login ด้วยรหัสผ่านครั้งแรก การวาง key เองจึงไม่ติดเงื่อนไขนี้
บน Laptop — คัดลอก public key:
cat ~/.ssh/id_ed25519.pubบน Linux server:
mkdir -p ~/.ssh
chmod 700 ~/.ssh
echo "ssh-ed25519 AAAA... [email protected]" >> ~/.ssh/authorized_keys
chmod 600 ~/.ssh/authorized_keys
แทนข้อความใน echo ด้วย output จาก cat ~/.ssh/id_ed25519.pub ทั้งบรรทัด
ทางเลือก: ssh-copy-id — ถ้า sshd ยังเปิด password auth อยู่ (ยังไม่ตั้ง PasswordAuthentication no):
ssh-copy-id [email protected]คำสั่งนี้ copy .pub ไปใส่ authorized_keys ให้อัตโนมัติ — ลงเสร็จแล้วค่อยปิด password auth ทีหลังได้ ถ้าปิดไปแล้ว หรือเครื่อง client ไม่มีคำสั่งนี้ (Windows บางเวอร์ชัน) ให้วาง key เองตามขั้นตอนด้านบน
ทดสอบ SSH ใน LAN ก่อน
ก่อนต่อ tunnel ตรวจว่า key ใช้ได้ในเครือข่ายบ้าน:
ssh [email protected]ถ้าเข้าได้โดยไม่ถามรหัสผ่าน (หรือถามแค่ passphrase ของ key) แปลว่าพร้อมใช้กับ tunnel แล้ว
Tip: ถ้าได้
Permission denied (publickey)ตรวจ permission บน Linux server — โฟลเดอร์~/.sshต้องเป็น700(เจ้าของอ่าน/เขียน/execute ได้คนเดียว) และauthorized_keysต้องเป็น600(เจ้าของอ่าน/เขียนได้คนเดียว) เนื้อหาในauthorized_keysต้องตรงกับ.pubบน Laptop ทุกตัวอักษร — ความหมายแต่ละหลักของเลข permission อธิบายใน Bitwise C# [1/3] Why to Bitwise (7= Read+Write+Execute,6= Read+Write,0= ไม่มีสิทธิ์)
Step 1: เพิ่ม SSH ingress ใน config (ฝั่ง server)
แก้ ~/.cloudflared/config.yml — เพิ่ม hostname สำหรับ SSH ก่อน catch-all http_status:404:
 tunnel: <tunnel-uuid>
 credentials-file: /home/your-username/.cloudflared/<tunnel-uuid>.json
 ingress:
   - hostname: app.yourdomain.com
     service: http://localhost:3000
+  - hostname: ssh.yourdomain.com
+    service: ssh://localhost:22
- service: http_status:404ssh://localhost:22บอกcloudflaredว่า hostname นี้ forward ไปที่ SSH daemon ไม่ใช่ HTTP- ถ้ามีแค่ SSH อย่างเดียว ก็ใส่แค่ rule SSH + catch-all ได้
Restart tunnel หลังแก้ config — ขึ้นกับวิธีที่รันอยู่ เช่น:
# ถ้ารันใน terminal
cloudflared tunnel run my-home-server

# ถ้ารันเป็น systemd service
sudo systemctl restart cloudflared
Step 2: ชี้ DNS ไปที่ Tunnel
cloudflared tunnel route dns my-home-server ssh.yourdomain.comคำสั่งนี้สร้าง CNAME ชี้ ssh.yourdomain.com ไปที่ tunnel UUID — เหมือนกับที่ทำ app.yourdomain.com ใน Remote Access: Expose Services with Cloudflare Tunnel (1/3)
Step 3: ติดตั้ง cloudflared บน client (Laptop)
บนเครื่องที่จะ SSH จาก ติดตั้ง cloudflared แล้วตรวจเวอร์ชัน:
brew install cloudflared   # macOS / Linux (Homebrew)
cloudflared --version
หา path เต็มสำหรับใส่ใน SSH config:
which cloudflared
# macOS (Homebrew): /opt/homebrew/bin/cloudflared หรือ /usr/local/bin/cloudflared
# Linux (Homebrew): /home/linuxbrew/.linuxbrew/bin/cloudflared
Step 4: ตั้ง ~/.ssh/config (ฝั่ง client)
เพิ่มใน ~/.ssh/config — ตัวอย่างบน macOS:
Host my-server
  HostName ssh.yourdomain.com
  ProxyCommand /opt/homebrew/bin/cloudflared access ssh --hostname %h
User your-usernameHost— alias สำหรับพิมพ์ssh(เช่นssh my-serverแทน hostname เต็ม)HostName— hostname ที่ตั้งใน tunnel และ DNS (ssh.yourdomain.com)ProxyCommand— แทน path ด้วยผลจากwhich cloudflared(บน Mac มักเป็น/opt/homebrew/bin/cloudflared)User— Linux user บน Linux server%h= ค่าจากHostName- ถ้า private key ไม่ใช่ path เริ่มต้น เพิ่ม
IdentityFile ~/.ssh/id_ed25519 cloudflared access sshเป็นคำสั่งฝั่ง client สำหรับเชื่อมผ่าน tunnel — ไม่ใช่ Cloudflare Access login; การยืนยันตัวตนทำที่sshdด้วย public key
Step 5: ทดสอบ SSH
ssh my-serverถ้าตั้ง User ใน config แล้ว คำสั่งด้านบนพอ — ควรเห็น shell บน Linux server หลัง sshd ยืนยัน public key
ตรวจ log ฝั่ง server ถ้ามีปัญหา:
journalctl -u cloudflared -n 50(Optional) scp, rsync, VS Code Remote-SSH
เมื่อ ProxyCommand ทำงานแล้ว เครื่องมือที่ใช้ OpenSSH มักใช้ config เดียวกันได้:
scp ./file.txt my-server:~/backup/
rsync -avz ./project/ my-server:~/project/
VS Code Remote-SSH — ใส่ my-server (ค่า Host ใน config) เป็น remote host; VS Code อ่าน ~/.ssh/config รวม ProxyCommand และ IdentityFile อัตโนมัติ
Troubleshooting
| ปัญหา | สาเหตุ | วิธีแก้ |
|---|---|---|
Connection refused / timeout | Tunnel ไม่รัน หรือ ingress ผิด | ตรวจว่า tunnel รันอยู่ ตรวจ service: ssh://localhost:22 แล้ว restart |
cloudflared: command not found (ฝั่ง client) | ไม่ได้ติดตั้งหรือ path ใน ProxyCommand ผิด | ติดตั้ง cloudflared แล้วใส่ absolute path จาก which cloudflared |
Permission denied (publickey) | SSH key ไม่ตรง user บน Linux server | ใช้ key เดียวกับที่ SSH ใน LAN ได้ หรือเพิ่ม/แก้ IdentityFile ใน config |
Host key verification failed | fingerprint เปลี่ยน (reinstall OS ฯลฯ) | ลบบรรทัดเก่าใน ~/.ssh/known_hosts สำหรับ hostname นั้น |
| SSH ได้ใน LAN แต่ผ่าน tunnel ไม่ได้ | sshd ไม่ฟัง หรือ firewall บล็อก localhost | sudo ss -tlnp | grep :22 ตรวจว่า sshd ฟังอยู่ |
สรุป
บทความนี้ต่อจาก Remote Access: Expose Services with Cloudflare Tunnel (1/3) — ใช้ tunnel เดิม เพิ่ม:
- ingress
ssh://localhost:22บน server - DNS
ssh.yourdomain.comชี้เข้า tunnel ProxyCommand cloudflared access sshบน Laptop- SSH public key ยืนยันตัวตนที่
sshd
ได้ SSH เข้า Linux server โดยไม่เปิด port 22 สู่โลกภายนอก — ทำงานได้แม้ไม่มี public IP
ถ้ายังไม่ได้ทำพื้นฐาน tunnel เริ่มที่ Remote Access: Expose Services with Cloudflare Tunnel (1/3)